前言:#
(写在前面的一些废话)最近在写给手机发送短信的一个功能,之前一直在用“创蓝253短信平台”,调用起来也是非常简单,根据域名构建一个Http请求即可。但是最近这个平台对签名审核变得非常的严格且对一些平台和APP是不发的(应该是因为这些小平台的安全性没有做好,才会这么严格),申请的时候还需要 APP的下载地址、官网、设计图纸等等,付款还需要公对公,这对于我们这些独立开发者来说很不友好,我提供了公司的营业执照(一个朋友的空壳公司)和部分APP的设计图纸(做的一个交友类小游戏),申请了三四次都给我驳回了,联系客服又给我说交友类、棋牌类游戏不发(一万个草泥马)。决定还是研究腾讯的短信服务吧,但是腾讯的短信API调用起来不是一般的麻烦(由于腾讯的SDK不支持在Windows环境,所以只能硬着头皮调用API了)。下面主要记录一下在调用腾讯短信API中的一些主要步骤。
最终目的:
使用UE4调用腾讯的发送短信API,给手机发送短信。
介绍腾讯云短信服务及用“API Explorer"在线发送验证码#
官方文档上有详细的文档说明,这里就不多赘述,这里主要是总结一下用法。我用的V3.0版本的API,使用 API的核心就是通过一些加密算法构建“签名串”,这个签名串用于构建HTTP请求,加密算法主要用的是“Opessll库”里面的部分函数,这个库的用法我单独写了一篇文章,参考“在Windows下配置Openssl环境”。
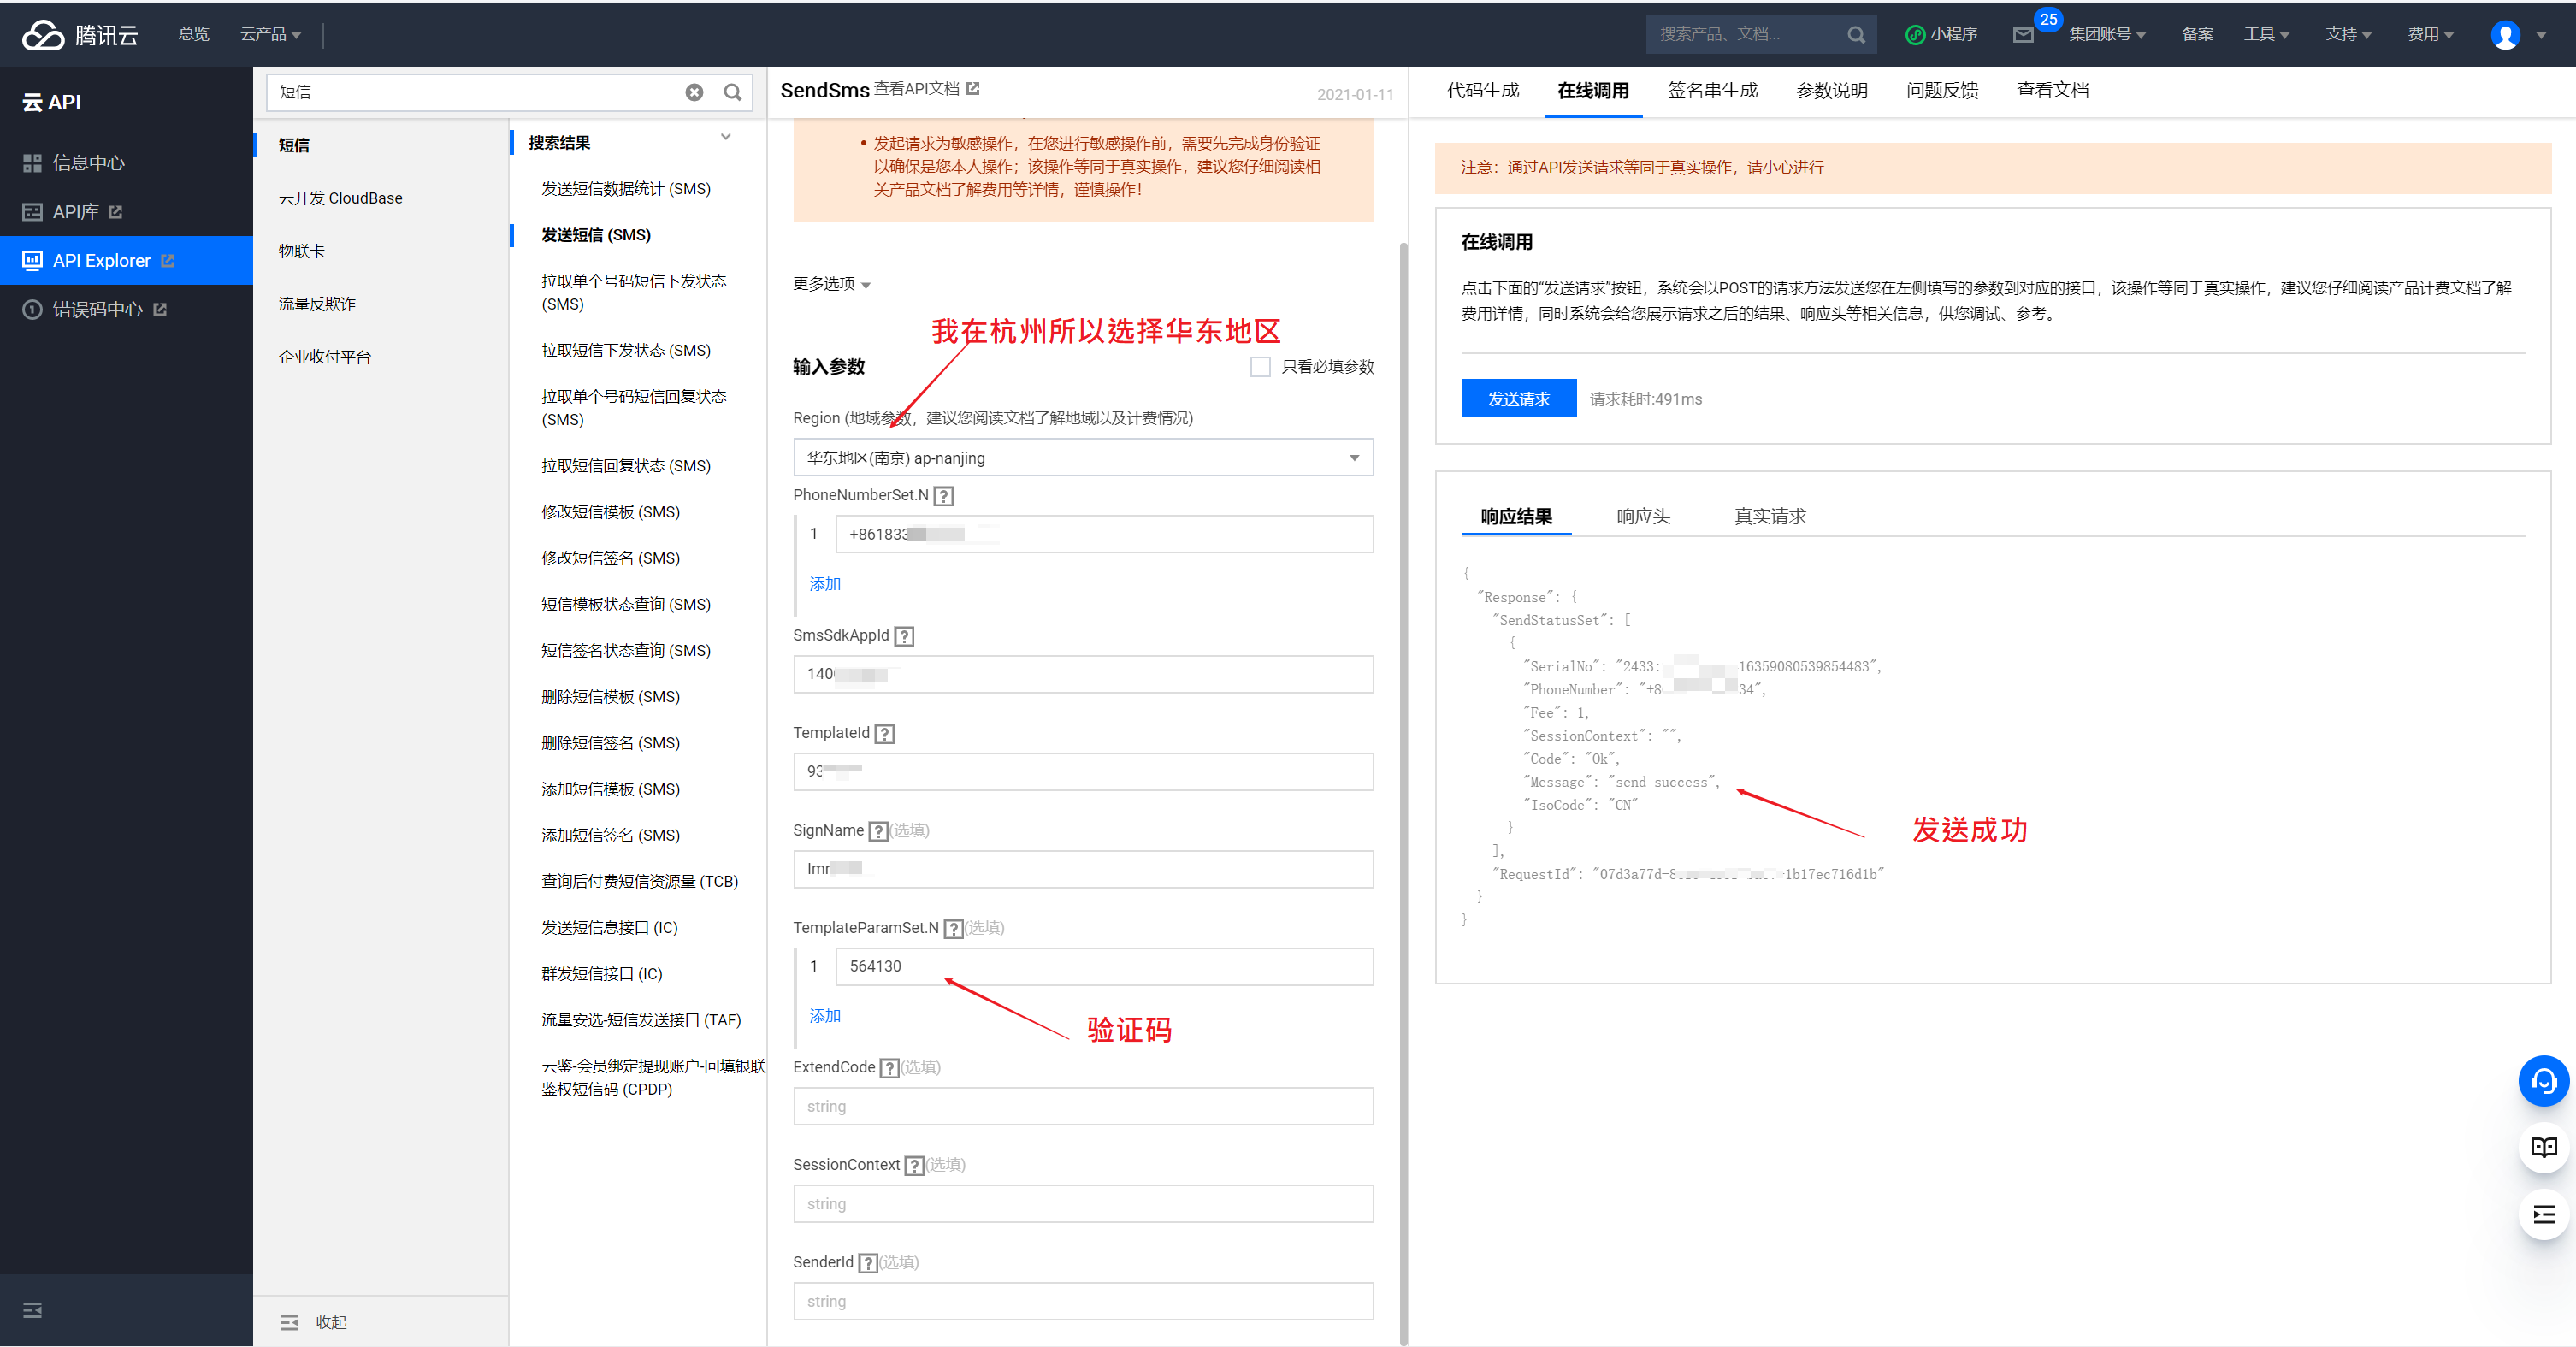
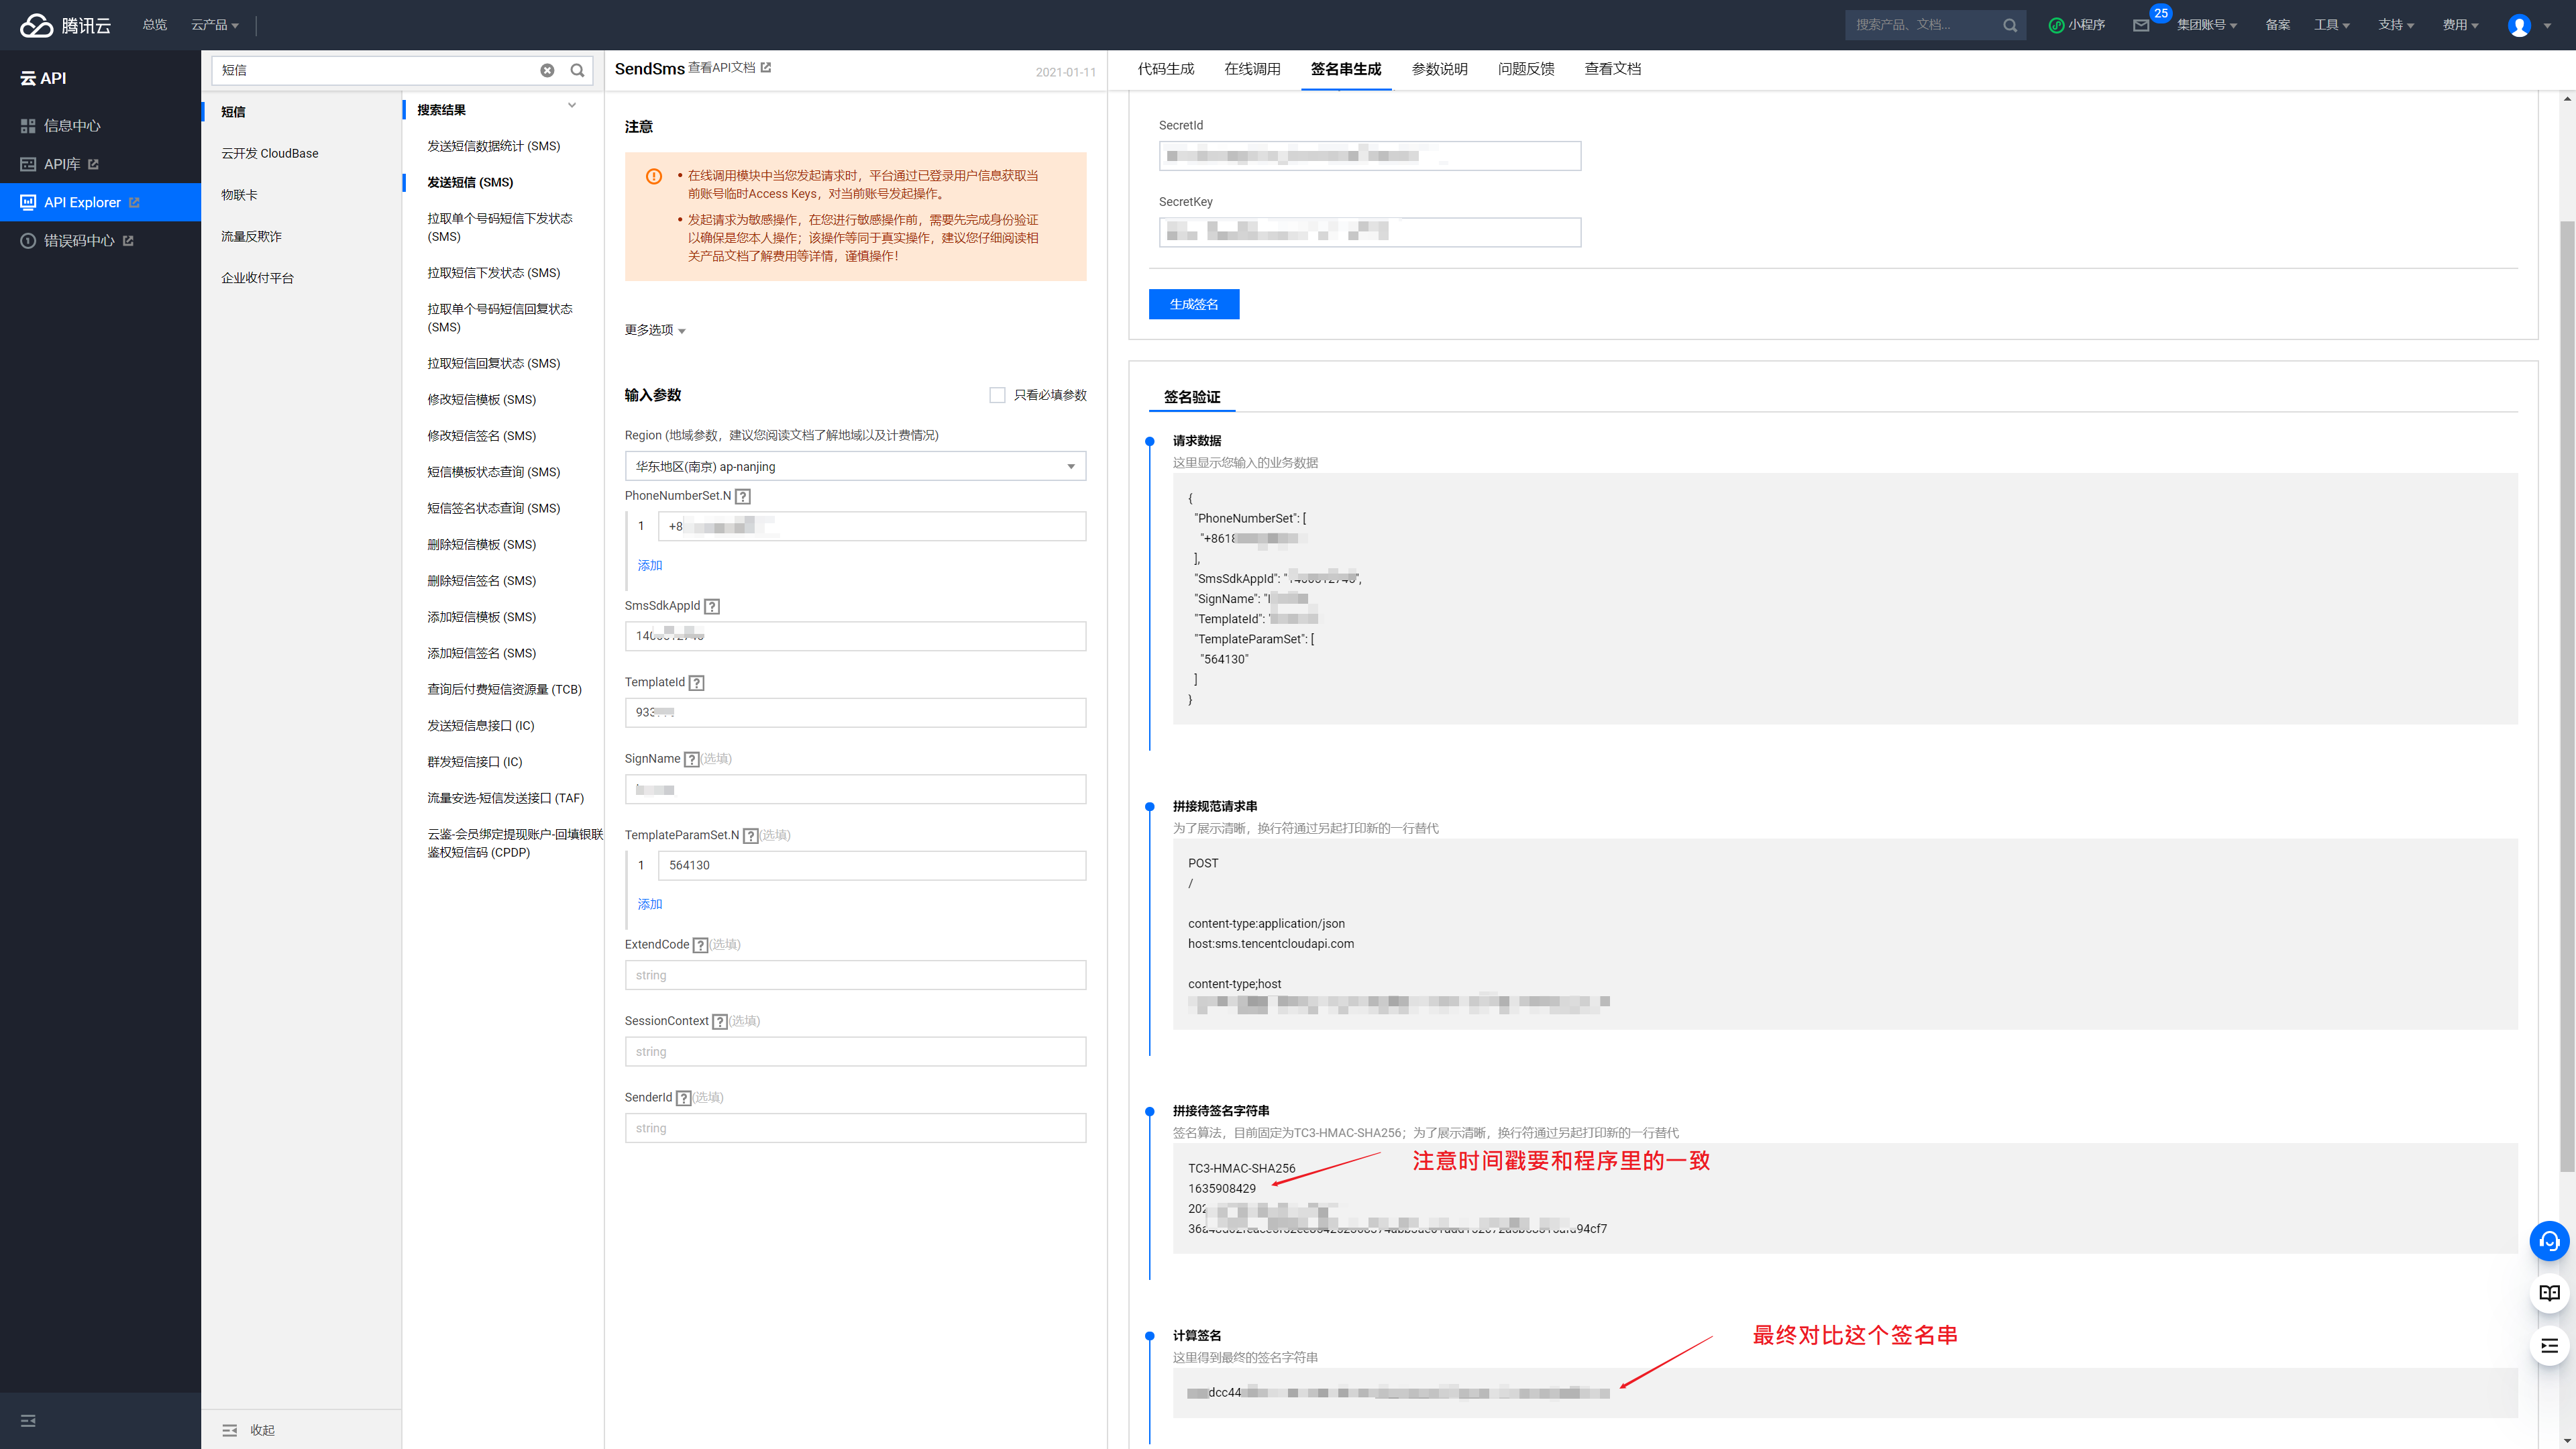
在测试阶段推荐使用“API Explorer”,这个可以在线发送验证码,生成签名串。发送验证码需要开通短信服务并申请签名和签名模板,还要申请腾讯SDK的秘钥和 ID(每个用户最多申请两个秘钥和 ID,)这部分官方文档有详细步骤,参考我当时发送的界面如图1-1所示。“API Explorer”生成的签名串可以用来验证你的生成签名串的程序,如图1-2所示。
使用"Postman"测试发送Http/Https请求#
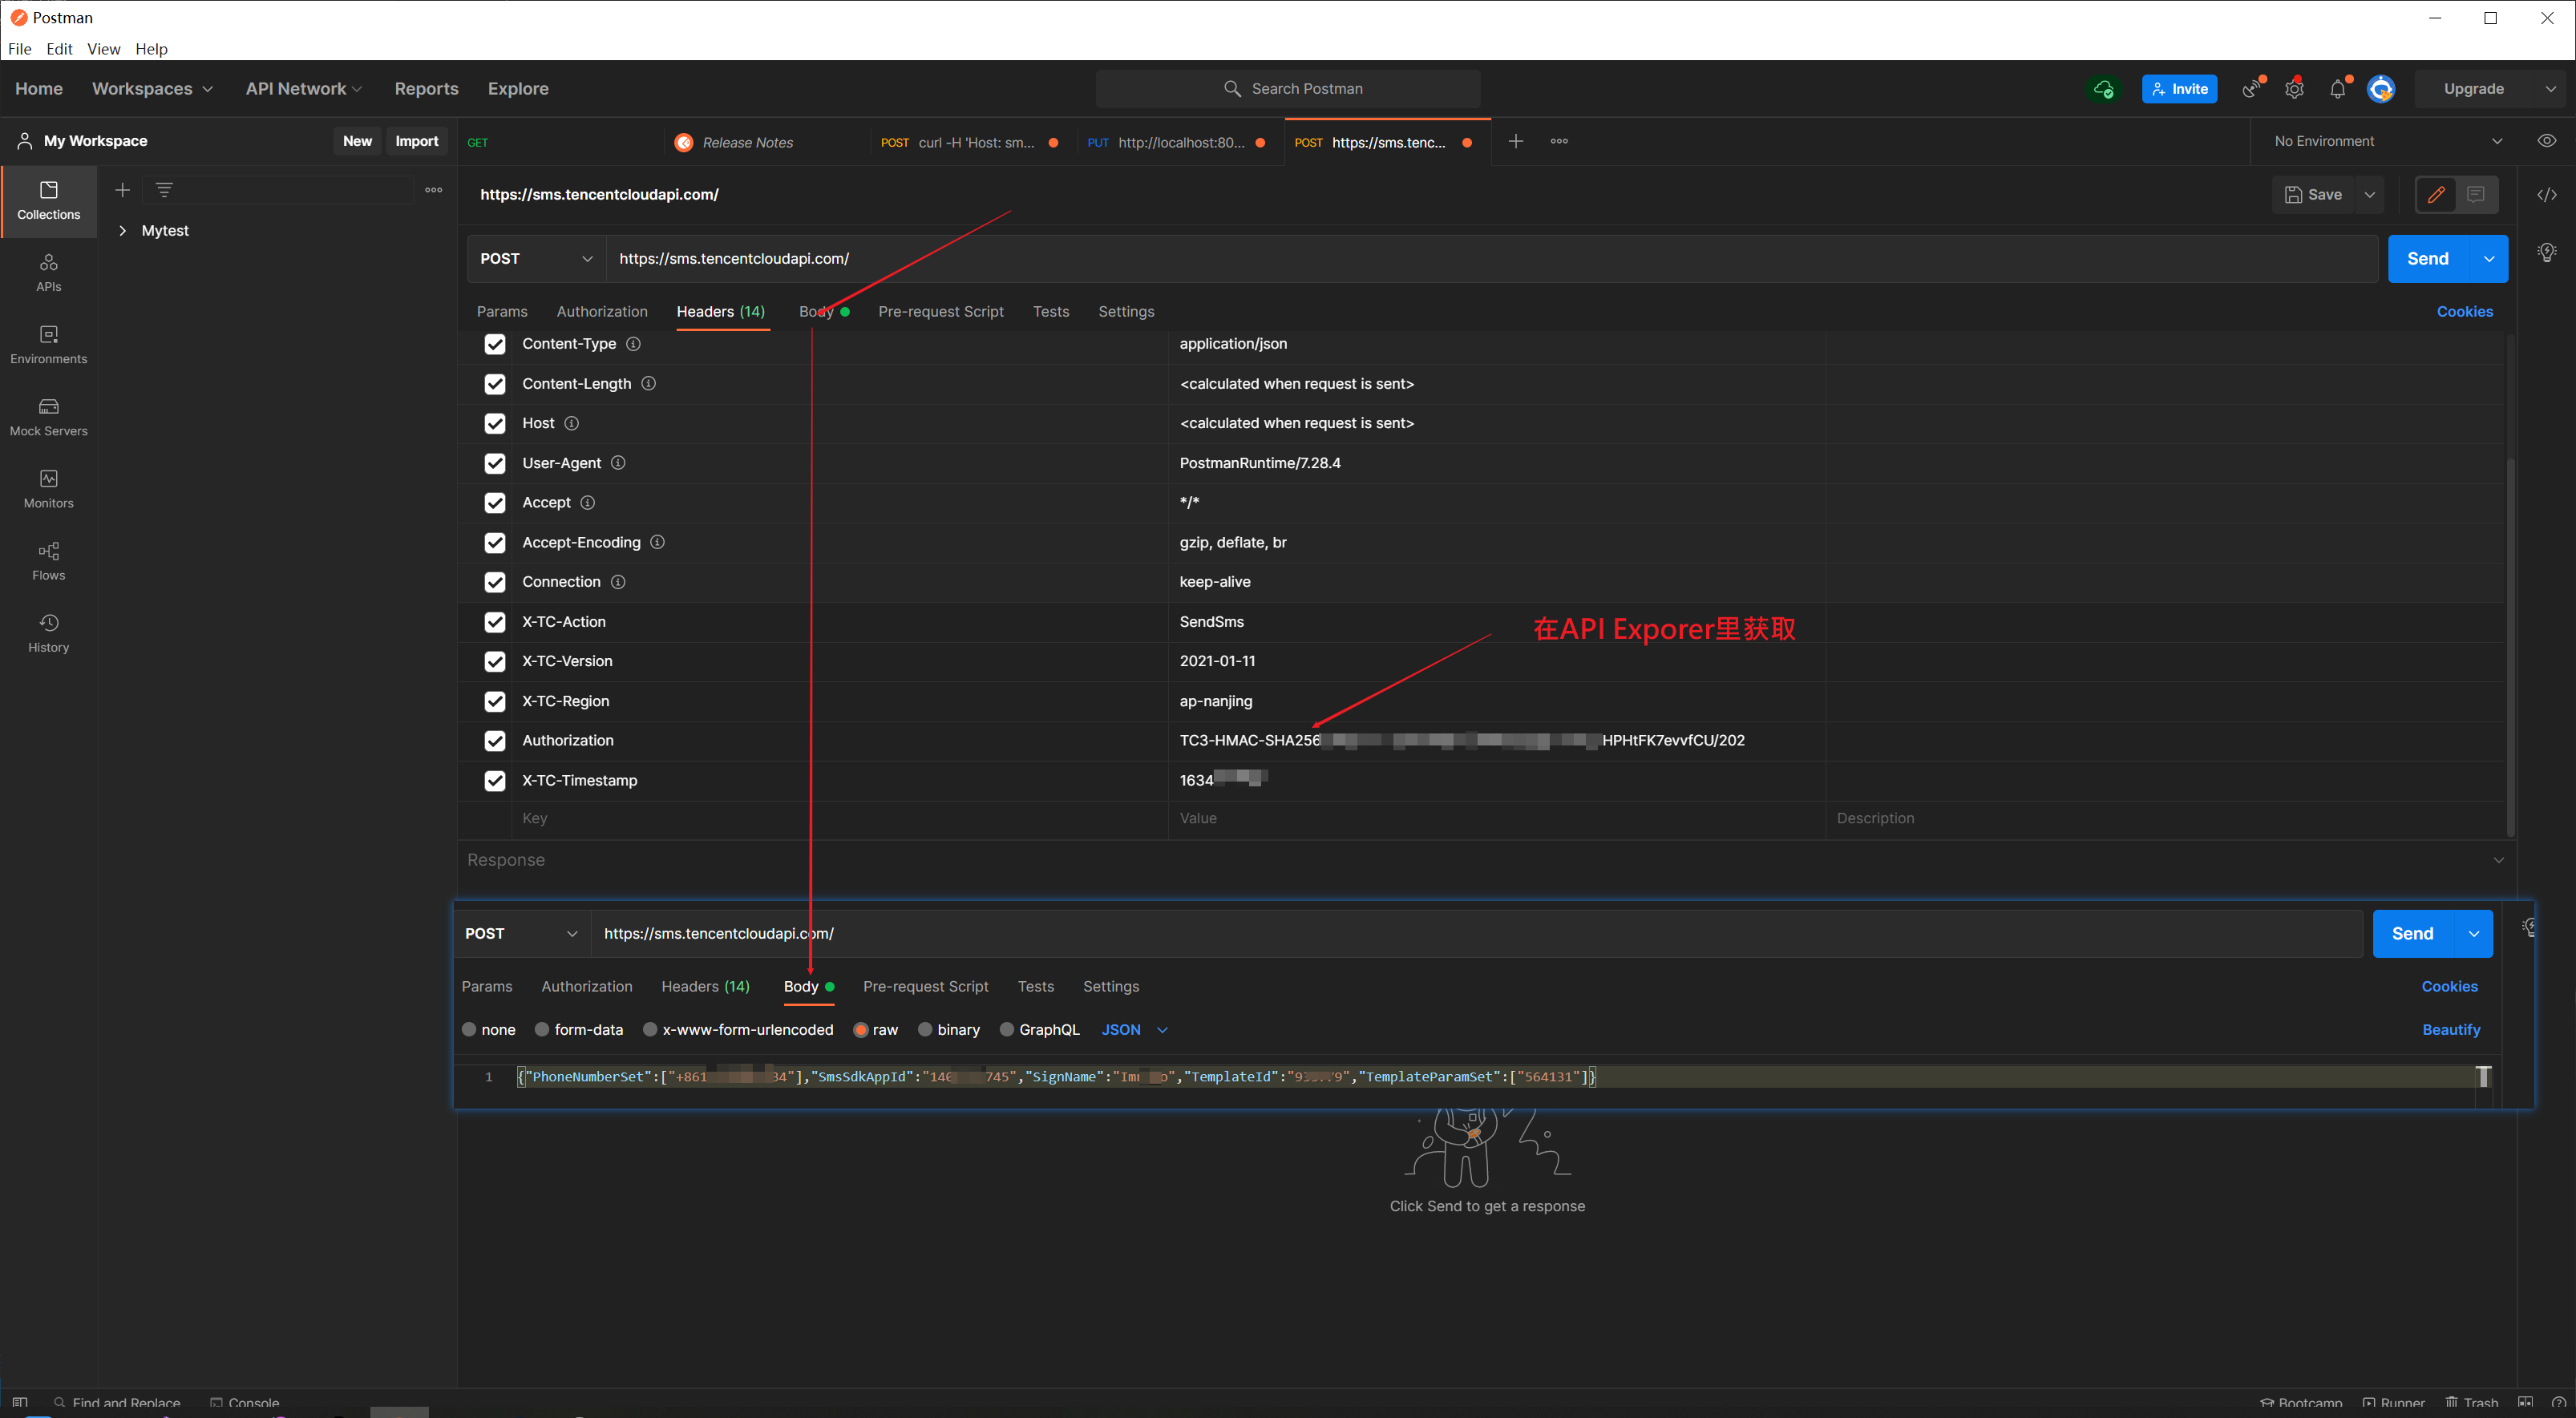
在使用C++编写HTTP请求之前,可以先使用软件“Postman”发送测试请求,以确保请求串没有错误。使用方法如图1-3所示:
使用纯C++项目生成“签名串”#
创建一个C++的空项目,添加一个CPP文件后,将官网的代码粘贴进去(官方文档链接:https://cloud.tencent.com/document/product/382/52072#C.2B.2B),参考文章“在Windows下配置Openssl环境”配好环境后,还需要改一个名叫“get_data”函数,如下面示例所示,之后应该就可以编译通过了。官网示例使用的接口不是发送短信接口,所以需要稍微改动一下代码。发送短信的部分改动代码如下:
函数改动:
string get_data(int64_t& timestamp)
{
int64_t ii = 1231232133;
string utcDate;
char buff[20] = { 0 };
//改动了这里,牵扯到time_t类型的初始化
time_t timenow = (time_t)(timestamp);
 1
 2
 3
 4
 5
 6
 7
 8
 9
10
11
|
struct tm sttime;
//sttime = *gmtime(×tamp);
gmtime_s(&sttime, &timenow);
//gmtime_s(, );
strftime(buff, sizeof(buff), "%Y-%m-%d", &sttime);
utcDate = string(buff);
return utcDate;
}
|
SendSms接口,生成字符串所必要的一些参数:
// 密钥参数
string SECRET_ID = “AKI**evvfCU”;
string SECRET_KEY = “3pLaZrkNkFTQ6VdU5PS”;
string service = “sms”;
string host = “sms.tencentcloudapi.com”;
string region = “ap-nanjing”;
string action = “SendSms”;
string version = “2021-01-11”;
int64_t timestamp = 1635181318;
string date = get_data(timestamp);
// ************* 步骤 1:拼接规范请求串 *************
string httpRequestMethod = “POST”;
string canonicalUri = “/”;
string canonicalQueryString = “”;
//string canonicalHeaders = “content-type:application/json; charset=utf-8\nhost:” + host + “\n”;
string canonicalHeaders = “content-type:application/json\nhost:” + host + “\n”;
string signedHeaders = “content-type;host”;
//string payload = “{"Limit": 1, "Filters": [{"Values": ["\u672a\u547d\u540d"], "Name": "instance-name"}]}”;
string payload = “{"PhoneNumberSet":["+86134"],"SmsSdkAppId":"1445","SignName":"Io","TemplateId":"93*79","TemplateParamSet":["564131"]}”;
string hashedRequestPayload = sha256Hex(payload);
string canonicalRequest = httpRequestMethod + “\n” + canonicalUri + “\n” + canonicalQueryString + “\n”
- canonicalHeaders + “\n” + signedHeaders + “\n” + hashedRequestPayload;
cout « canonicalRequest « endl;
使用UE4C++项目生成“签名串”#
1、使用UE4原生模块发送简单Http请求(熟悉HTTP的可以跳过)
我这里使用UE4-426版本,创建一个空的C++项目,然后创建一个Library插件。要发送Http请求首先要添加相关模块,在“.Build.cs”文件中添加“HTTP”模块。
1
2
3
4
5
6
7
8
9
10
11
12
|
PrivateDependencyModuleNames.AddRange(
new string[]
{
"CoreUObject",
"Engine",
"Slate",
"SlateCore",
"HTTP",
// ... add private dependencies that you statically link with here ...
}
)
|
(写给对HTTP不熟悉的新手)在写发送HTTP程序之前我们思考一下,如何才能确定HTTP请求成功了呢?一般的,请求应该放在客户端中进行,对应的应该还有一个服务端用来接收并处理数据。这里可以参考UE4官方文档中的“网页远程控制->远程控制快速入门”(链接如下),网页远程控制系统在虚幻引擎中运行了一个网页服务器(详情参考链接),此文档会教你如何创建一个工程工程并启动服务器,还会使用“Postman”软件测试服务器。服务器没问题后,就可以用我们写的HTTP请求程序向服务器发送相关请求,用来验证写的HTTP请求程序。
https://docs.unrealengine.com/4.27/zh-CN/ProductionPipelines/ScriptingAndAutomation/WebControl/QuickStart/
测试代码如下(向UE4引擎运行的网页服务器发送请求),如果请求成功,UE4引擎中应该会有相应的变化,在阅读这一段之前建议先把“远程控制快速入门”跟着做一遍
 1
 2
 3
 4
 5
 6
 7
 8
 9
10
11
12
13
14
15
16
17
18
19
20
21
22
23
24
25
26
27
28
29
30
31
32
|
#include "SimpleHttp.h"
void USimpleHttpBPLibrary::SendSimpleHttpRespont()
{
TSharedPtr<IHttpRequest> HttpReuest = FHttpModule::Get().CreateRequest();
FString URL = "http://127.0.0.1:8080/remote/object/call";
FString Data = "{\"objectPath\":\"/Game/ThirdPersonBP/Maps/ThirdPersonExampleMap.ThirdPersonExampleMap:PersistentLevel.SkySphereBlueprint\",\"functionName\":\"RefreshMaterial\",\"generateTransaction\":true}";
HttpReuest->SetVerb("PUT");
HttpReuest->SetHeader("Content-Type", "application/json");
//HttpReuest->SetHeader("User-Agent", "application/x-www-form-urlencoded;charset=utf-8");
HttpReuest->SetURL(URL);
HttpReuest->SetContentAsString(Data);
HttpReuest->OnProcessRequestComplete().BindStatic(&USimpleHttpBPLibrary::OnRequestComplete);
if (HttpReuest->ProcessRequest())
{
GEngine->AddOnScreenDebugMessage(-1,5.0f,FColor::Blue, "Success");
}
else
{
GEngine->AddOnScreenDebugMessage(-1, 5.0f, FColor::Blue, "Faile");
}
}
void USimpleHttpBPLibrary::OnRequestComplete(FHttpRequestPtr HttpRePtr, FHttpResponsePtr HttpResPtr, bool Success)
{
auto fd = HttpRePtr->GetContent();
FString tt = HttpResPtr->GetContentAsString();
GEngine->AddOnScreenDebugMessage(-1, 5.0f, FColor::Blue, tt);
}
|
2、在 UE4项目中配置Openssl环境(UE4中引用第三方链接库)。
在UE4项目中无法按照文章“在Windows下配置Openssl环境”配置相关环境,UE4的项目属性中没有“链接器->输入”,所以无法指定第三方静态链接库。UE4引用第三方静态链接库需要在“.Build.cs”文件中配置。
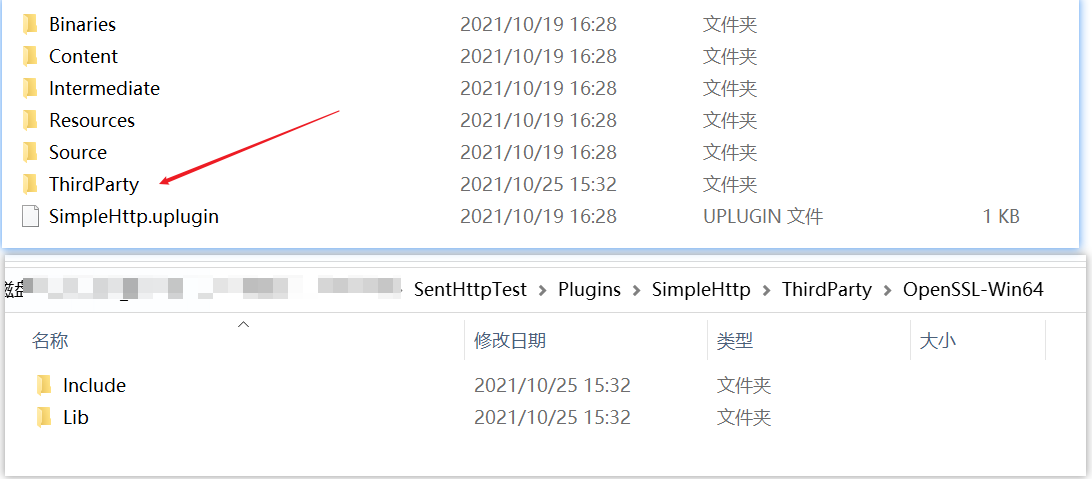
首先在插件的根目录的下创建文件夹“ThirdParty”,然后去“Openssl”的安装目录下找到文件夹“OpenSSL-Win64”(我这里的目录为“C:\Program Files\OpenSSL-Win64”),最后将这个文件夹复制到“ThirdParty”中,并保留文件夹“Include”、“Lib”两个文件夹,其余全删除。如图1-4所示。
打开插件中的“.Build.cs”文件,进行一些IO操作,将第三方静态链接库自动应用。完整代码如下:
// Some copyright should be here…
using System.IO;
using UnrealBuildTool;
public class SimpleHttp : ModuleRules
{
/——————Begin——————/
private string ModulePath
{
// get { return Path.GetDirectoryName(RulesCompiler.GetModuleFilename(this.GetType().Name)); }
get { return ModuleDirectory; }
}
private string ThirdPartyPath
{
get { return Path.GetFullPath(Path.Combine(ModulePath, “../../ThirdParty/”)); }
}
private string MyLibPath //第三方库MyTestLib的目录
{
get { return Path.GetFullPath(Path.Combine(ThirdPartyPath, “OpenSSL-Win64”)); }
}
/——————End——————/
public SimpleHttp(ReadOnlyTargetRules Target) : base(Target)
{
PCHUsage = ModuleRules.PCHUsageMode.UseExplicitOrSharedPCHs;
1
2
3
4
5
6
7
8
9
10
11
12
13
14
15
16
17
18
19
20
21
22
23
24
25
26
27
28
29
30
31
32
33
34
35
36
37
38
39
40
41
42
43
44
45
46
47
48
49
50
51
52
53
54
55
56
57
58
59
60
61
62
63
64
65
66
67
|
PublicIncludePaths.AddRange(
new string[] {
// ... add public include paths required here ...
}
);
PrivateIncludePaths.AddRange(
new string[] {
// ... add other private include paths required here ...
}
);
PublicDependencyModuleNames.AddRange(
new string[]
{
"Core",
// ... add other public dependencies that you statically link with here ...
}
);
PrivateDependencyModuleNames.AddRange(
new string[]
{
"CoreUObject",
"Engine",
"Slate",
"SlateCore",
"HTTP",
// ... add private dependencies that you statically link with here ...
}
);
DynamicallyLoadedModuleNames.AddRange(
new string[]
{
// ... add any modules that your module loads dynamically here ...
}
);
/*------------------Begin------------------*/
LoadThirdPartyLib(Target);
/*------------------End------------------*/
}
/*------------------Begin------------------*/
public bool LoadThirdPartyLib(ReadOnlyTargetRules Target)
{
bool isLibrarySupported = false;
if ((Target.Platform == UnrealTargetPlatform.Win64) || (Target.Platform == UnrealTargetPlatform.Win32))//平台判断
{
isLibrarySupported = true;
System.Console.WriteLine("----- isLibrarySupported true");
//string PlatformSubPath = (Target.Platform == UnrealTargetPlatform.Win64) ? "Win64" : "Win32";
string LibrariesPath = Path.Combine(MyLibPath, "Lib");
PublicAdditionalLibraries.Add(Path.Combine(LibrariesPath,/* PlatformSubPath,*/ "libssl.lib"));//加载第三方静态库.lib
PublicAdditionalLibraries.Add(Path.Combine(LibrariesPath,/* PlatformSubPath,*/ "libcrypto.lib"));//加载第三方静态库.lib
}
if (isLibrarySupported) //成功加载库的情况下,包含第三方库的头文件
{
// Include path
System.Console.WriteLine("----- PublicIncludePaths.Add true");
PublicIncludePaths.Add(Path.Combine(MyLibPath, "Include"));
}
return isLibrarySupported;
}
/*------------------End------------------*/
}
|
根据“签名串”构造HTTP请求,发送短信
3、接下来将上面“纯C++项目”中用来生成“签名串”的函数,写到插件中对用的蓝图函数库中,编译即可。
这里需要注意的是:使用函数“ToUnixTimestamp()”生成的时间戳和中国时区相差八个小时,计算时间戳的时候需要减去“28800”
编译后使用蓝图调用函数“SendSimpleHttpRespont1()”即可发送短信,我这里是用来测试,所以将生成签名串的逻辑放到了客户端,正式项目中不建议将这部分代码放到客户端,因为将秘钥ID和秘钥放到客户端是危险的。项目中可以采用分布式,将含有敏感的信息放到服务端。
cpp文件(部分代码)完整源代码参考压缩文件:
 1
 2
 3
 4
 5
 6
 7
 8
 9
10
11
12
13
14
15
16
17
18
19
20
21
22
23
24
25
26
27
28
29
30
31
32
33
34
35
36
37
38
39
40
41
42
43
44
45
46
47
48
49
50
51
52
53
54
55
56
57
58
59
60
61
62
63
64
65
66
67
68
69
70
71
72
73
74
75
76
77
78
79
80
81
82
83
84
85
86
87
88
89
90
91
92
93
94
95
96
97
98
99
100
101
|
void USimpleHttpBPLibrary::SendSimpleHttpRespont1()
{

TSharedPtr<IHttpRequest> HttpReuest = FHttpModule::Get().CreateRequest();

FDateTime Now;

int64 Abs = 28800;

int64 timestamp = Now.Now().ToUnixTimestamp() - Abs;

//Now.UtcNow().ToString();

const FString str_Timestamp = FString::FromInt(timestamp);

FString str_Authorization = MakeAuthorization(timestamp);

FString Data = "{\"PhoneNumberSet\":[\"+86184\"],\"SmsSdkAppId\":\"1402745\",\"SignName\":\"Imrcao\",\"TemplateId\":\"933779\",\"TemplateParamSet\":[\"564131\"]}";
FString URL = "https://sms.tencentcloudapi.com/";
//FString URL = "sms.tencentcloudapi.com";

HttpReuest->SetVerb("POST");
HttpReuest->SetHeader("Content-Type", "application/json");

//公共参数设置为头部
HttpReuest->SetHeader("X-TC-Action", "SendSms");
HttpReuest->SetHeader("X-TC-Region", "ap-nanjing");
HttpReuest->SetHeader("X-TC-Timestamp", str_Timestamp);
HttpReuest->SetHeader("X-TC-Version", "2021-01-11");
HttpReuest->SetHeader("Authorization", str_Authorization);
//HttpReuest->SetHeader("Host", "sms.tencentcloudapi.com");

HttpReuest->SetURL(URL);

HttpReuest->SetContentAsString(Data);

HttpReuest->OnProcessRequestComplete().BindStatic(&USimpleHttpBPLibrary::OnRequestComplete);

if (HttpReuest->ProcessRequest())
{
//LoginMsg(TEXT("Post ok"));
GEngine->AddOnScreenDebugMessage(-1, 5.0f, FColor::Blue, "Success");
}
else
{
//LoginMsg(TEXT("Post failed"));
GEngine->AddOnScreenDebugMessage(-1, 5.0f, FColor::Blue, "Faile");
}
}

FString USimpleHttpBPLibrary::MakeAuthorization(int64 Timestamp_)
{
// 密钥参数
string SECRET_ID = "AKIDZy*********evvfCU";
string SECRET_KEY = "3pLaZH********rkNkFTQ6VdU5PS";

string service = "sms";
string host = "sms.tencentcloudapi.com";
string region = "ap-nanjing";
string action = "SendSms";
string version = "2021-01-11";
int64_t timestamp = Timestamp_;
string date = get_data(timestamp);

// ************* 步骤 1:拼接规范请求串 *************
string httpRequestMethod = "POST";
string canonicalUri = "/";
string canonicalQueryString = "";
//string canonicalHeaders = "content-type:application/json; charset=utf-8\nhost:" + host + "\n";
string canonicalHeaders = "content-type:application/json\nhost:" + host + "\n";
string signedHeaders = "content-type;host";
//string payload = "{\"Limit\": 1, \"Filters\": [{\"Values\": [\"\\u672a\\u547d\\u540d\"], \"Name\": \"instance-name\"}]}";
string payload = "{\"PhoneNumberSet\":[\"+8618********34\"],\"SmsSdkAppId\":\"1400512745\",\"SignName\":\"Imrcao\",\"TemplateId\":\"933779\",\"TemplateParamSet\":[\"564131\"]}";
string hashedRequestPayload = sha256Hex(payload);
string canonicalRequest = httpRequestMethod + "\n" + canonicalUri + "\n" + canonicalQueryString + "\n"
+ canonicalHeaders + "\n" + signedHeaders + "\n" + hashedRequestPayload;
cout << canonicalRequest << endl;

// ************* 步骤 2:拼接待签名字符串 *************
string algorithm = "TC3-HMAC-SHA256";
string RequestTimestamp = int2str(timestamp);
string credentialScope = date + "/" + service + "/" + "tc3_request";
string hashedCanonicalRequest = sha256Hex(canonicalRequest);
string stringToSign = algorithm + "\n" + RequestTimestamp + "\n" + credentialScope + "\n" + hashedCanonicalRequest;
cout << stringToSign << endl;

// ************* 步骤 3:计算签名 ***************
string kKey = "TC3" + SECRET_KEY;
string kDate = HmacSha256(kKey, date);
string kService = HmacSha256(kDate, service);
string kSigning = HmacSha256(kService, "tc3_request");
string signature = HexEncode(HmacSha256(kSigning, stringToSign));
cout << signature << endl;

// ************* 步骤 4:拼接 Authorization *************
string authorization = algorithm + " " + "Credential=" + SECRET_ID + "/" + credentialScope + ", "
+ "SignedHeaders=" + signedHeaders + ", " + "Signature=" + signature;
cout << authorization << endl;

return FString(authorization.c_str());
}
|
—————————————————分割线(更新)—————————————————-
打包时出现的报错问题
1、报错如下,显示链接相关问题。先说结果,这个报错并没有实际解决。但最终还是完成了这个功能,下面讲一下思路。
UATHelper: Packaging (Windows (64-bit)): libcurl_a.lib(bio_lib.obj) : error LNK2005: BIO_free already defined in libcrypto.lib(libcrypto-1_1-x64.dll)
UATHelper: Packaging (Windows (64-bit)): libcurl_a.lib(bss_mem.obj) : error LNK2005: BIO_new_mem_buf already defined in libcrypto.lib(libcrypto-1_1-x64.dll)
UATHelper: Packaging (Windows (64-bit)): libcurl_a.lib(p_lib.obj) : error LNK2005: EVP_PKEY_assign already defined in libcrypto.lib(libcrypto-1_1-x64.dll)
UATHelper: Packaging (Windows (64-bit)): libcurl_a.lib(p_lib.obj) : error LNK2005: EVP_PKEY_new already defined in libcrypto.lib(libcrypto-1_1-x64.dll)
2、前面说了最好将秘钥ID和秘钥放到服务器中,所以我试着将发送验证码的逻辑放到服务器中。我这里用的是用UE4的独立程序做的分布式服务器,关于如何使用UE4开发独立程序可以参考《大象无形》这本书的第14章,至于如何做服务器就比较麻烦,可以参考AboutCG上人宅老师的课程《MOba分布式网络游戏全流程高级教学》第十章和第十一章,看这个教程需要一定的基础知识。
3、具体实现步骤:首先将插件放到引擎的插件目录中作为引擎插件,然后修改插件部分代码,让它可以给独立程序使用。我这里的插件目录为:(注意使用的是源代码引擎)
“C:\UnrealEngine-4.25\UnrealEngine\Engine\Plugins\TencentSendSmaAPI”
需要知道的是独立程序不能引用模块“Engine”和“Editor”,所以要修改插件中“.Build.cs”文件,将“Engine”模块给删掉。如果你创建的插件是蓝图函数库,且继承了“UBlueprintFunctionLibrary”,去掉引擎模块之后,编译会报错,所以需要将其改为继承“UObject”。实例代码如下:
UCLASS()
 1
 2
 3
 4
 5
 6
 7
 8
 9
10
11
12
13
14
15
16
17
18
19
20
|
class UTencentSendSmaAPIBPLibrary : public UBlueprintFunctionLibrary
{
GENERATED_UCLASS_BODY()

public:

UFUNCTION(BlueprintCallable, Category = "SimpleHttp")
static void TrySendVerificationBP(FString Phone);
};
//改为如下:
UCLASS()
class UTencentSendSmaAPIBPLibrary : public UObject
{
GENERATED_UCLASS_BODY()

public:

UFUNCTION(BlueprintCallable, Category = "SimpleHttp")
static void TrySendVerificationBP(FString Phone);
};
|
4、在独立程序中“.Build.cs”文件中,添加插件:
using UnrealBuildTool;
public class DbServer : ModuleRules
{
public DbServer(ReadOnlyTargetRules Target) : base(Target)
{
 1
 2
 3
 4
 5
 6
 7
 8
 9
10
11
|
PublicIncludePaths.Add("Runtime/Launch/Public");

PrivateIncludePaths.Add("Runtime/Launch/Private");
PrivateDependencyModuleNames.Add("Core");
PrivateDependencyModuleNames.Add("Projects");
PrivateDependencyModuleNames.Add("ApplicationCore")
PrivateDependencyModuleNames.Add("TencentSendSmaAPI"); //发送短信插件
PrivateDependencyModuleNames.Add("HTTP");
}
}
|
编译后发现还是会报错,这时修改插件中的“.Build.cs”文件,将函数”LoadThirdPartyLib”中的两行代码删除就可以编译通过了,代码如下;
public bool LoadThirdPartyLib(ReadOnlyTargetRules Target)
{
 1
 2
 3
 4
 5
 6
 7
 8
 9
10
11
12
13
14
15
16
17
18
|
bool isLibrarySupported = false;
if ((Target.Platform == UnrealTargetPlatform.Win64) || (Target.Platform == UnrealTargetPlatform.Win32))//平台判断
{
isLibrarySupported = true;
System.Console.WriteLine("----- isLibrarySupported true");
string LibrariesPath = Path.Combine(MyLibPath, "Lib");
//PublicAdditionalLibraries.Add(Path.Combine(LibrariesPath,/* PlatformSubPath,*/ "libssl.lib"));//加载第三方静态库.lib
//PublicAdditionalLibraries.Add(Path.Combine(LibrariesPath,/* PlatformSubPath,*/ "libcrypto.lib"));//加载第三方静态库.lib
}
if (isLibrarySupported) //成功加载库的情况下,包含第三方库的头文件
{
// Include path
System.Console.WriteLine("----- PublicIncludePaths.Add true");
PublicIncludePaths.Add(Path.Combine(MyLibPath, "Include"));
}
return isLibrarySupported;
}
/*------------------End------------------*/
|
5、最后调用发送短信的函数,代码如下。配合客户端调试没问题后即可将独立程序剥离,部署到服务器上,关于如何剥离独立程序请看文章《如何剥离UE4独立程序》。
 1
 2
 3
 4
 5
 6
 7
 8
 9
10
11
12
13
14
15
16
|
#include "SendSms.h"

if (USendSms::GetSendSms())
{
//先不考虑验证码发送失败的情况(手机号收入正确一般不会失败,同一个手机号在在三分钟、一小时、一天内都有接收验证数量上限)
if (USendSms::GetSendSms()->TrySendVerification(account))
{
FString Verica = USendSms::GetSendSms()->GetVerification();

if (Verica.Len() == 6)
{
//将验证码发送给Login服务器,在Login服务器中将验证码转发给用户客户端
SIMPLE_PROTOCOLS_SEND(SP_GetVerificationSucceed, Verica, AddrInfo);
}
}
}
|